Wrecker and Omega - Unit Guide


Wrecker and Omega, are the two most childlike members of the Bad Batch. Wrecker is known to be the muscle of the group and is often the one who takes care of anything related to explosives. Omega is the most recent member of the Batch, but she is technically the oldest. She, like Boba, is an unaltered clone of Jango Fett.
In the game, their abilities and personalities translate to lots of attacks, displacement, and defensive support. The main body on the base is Wrecker, so more of the abilities are based around him, however, Omega still shows in some places. They are one of the best secondaries the Republic has seen since Rex. Let's talk about why.
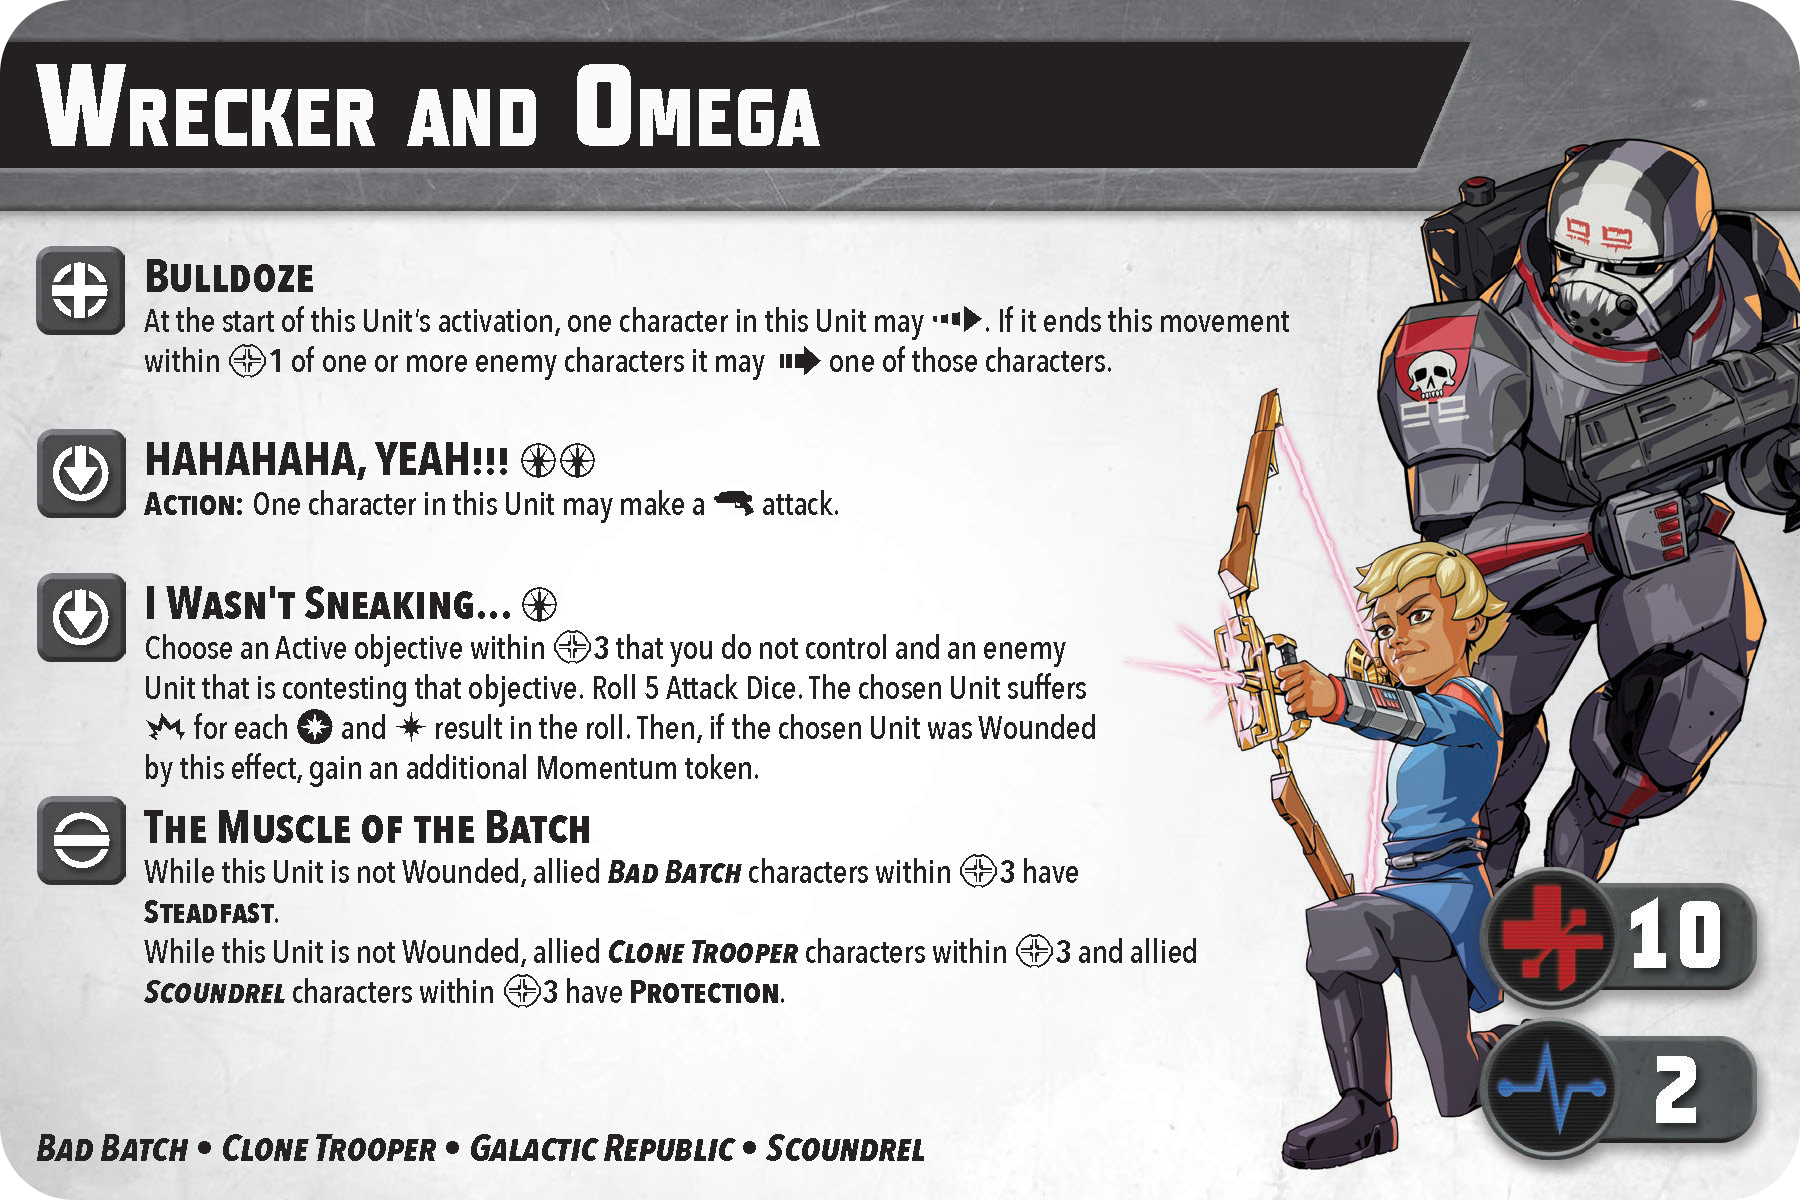
- 4 Points Cost
- 0 Force
- 10 Stamina / 2 Durability
- Secondary | Bad Batch - Clone Trooper - Galactic Republic - Scoundrel
Four Points is still, and likely will always be, the most flexible place to be. Like Hunter, this flexibility is nice, but Wrecker is pretty much always with Hunter anyway. He can be taken in other lists and squads, but I haven't seen or tried much of that yet.
Their durability is insane. They start with an already amazing ten stamina, but it really feels more like eleven or more since they always have protection while they are not wounded. Ten + Protection is significantly better than just eleven. Basically speaking their stamina is (10 + 1X) where X = However many times they're attacked. That means if it takes six attacks to wound them, they pretty much have sixteen stamina. Insane. Two durability means they can potentially leave the table, but over 20-30 games with them so far it has not happened to me yet.
Their tags are the exact same as Hunter's. Bad Batch and Clone Trooper give them, access to stuff like Hunter's Identity, their own aura, and a few other things. Galactic Republic (the best tag in the game) gives them access to a TON of different abilities and Identities. Scoundrel is helpful when you put them with Hondo. Overall, their Tags are pretty solid.

Bulldoze - I was wondering if and how the Bad Batch would be getting some form of Diceless Displacement. This ability is very good. Not only for the dash, but the shove is wonderful. Since it does not come from the combat tree, Steadfast does not affect it. This ability can sometimes be a bit difficult to pull off in the early game, but once they've had their first activation, you can usually use this every time. Two keynotes about this that are not obvious at first glance: 1. It does not care about elevation. As long as you end the move within range one of a unit, even if they're on top of a building and you're on the ground, you can still shove them. 2. You can Dash -> use an ingress point -> then shove. This allows them to get a little bit extra range on the move, which can be very helpful.
HAHAHAHA, YEAH!!! - This is probably their least helpful ability and it is still very good. The option to make two full-blown attacks in a single activation is very nice. Do note that this ability, even tho it uses an action, is NOT a "combat action" per the rules. That means, sadly, that Hunter's Identity, Coordinate Fire: X, etc. do not proc off of this attack. The nice thing is that it's not just another "five-dice attack" like many other units have. This one is six dice. If you need to shove or wound something this ability is your friend. The potential for up to FIVE shoves in one activation is pretty awesome. With all of that said, I have not used this ability more than five-ish times over 30ish games. When I have used it, it won me Struggles and games. Two force is a steep price for this ability but when you need it, it's nice to have the option.
I Wasn't Sneaking... - This ability is also incredible. Upwards of five unblockable damage for one force is already very good, but you can also potentially gain additional momentum from this if you wound your target. Now, in order to use this ability your target has to be contesting an active objective that you DO NOT control. On paper, that sounds a bit tough to pull off, but in practice, it's actually not hard at all. The best targets for this ability are usually lone bodies that are close to becoming wounded but their are still lots of good options. This ability, in addition to the previous two, allows Wrecker and Omega to potentially wound/displace up to FOUR characters in one turn. That's more than most primaries wound/displace. Now, is that all that common? No, but, I have had it happen in two games so far. It won me both games flat out. They Bulldoze the healthiest character off of the point -> use HAHAHA to shoot and displace/wound a second character -> attack a third character and wound/displace them -> Sneaking the least healthy character, ideally wounding them -> take control of the point and gain up to four Momentum in one turn -> profit. With all of that said, I would not recommend using this ability on units that have more than three or four health left, it's just probably not worth the one force.

The Muscle of the Batch - As if the last three abilities weren't good enough. This could be the only ability on their card and I'd still take them over every other GAR secondary except Rex (Okay, that's a bit hyperbolic, but you get the point). Giving Steadfast to all of your allied Batchers within three is absolutely incredible. It makes the team as a whole so much harder to displace via combat, especially if you add Kenobi to the mix. In addition to that, all allied Clones or Scoundrels within three get Protection! All Clones in this game love access to Protection, especially the rest of the Batch. Hunter and Wrecker are probably the best two-character team in the game, maybe second only to Dooku and a Magna. This ability is at least 80% of the reason why you bring Wrecker and Omega.
Stances
They are one of the few non-primary units to have two stances and both of them are good. It's pretty straightforward with Boom! being their more damage/offensive side and Tuning Out Distractions being their more effects/defensive side. I personally always start the game in Boom! and flip to Tuning at the end of their first activation. I'll usually flip to Boom! at the start of the next and decide from there what I need depending on how the game is going.

Boom!
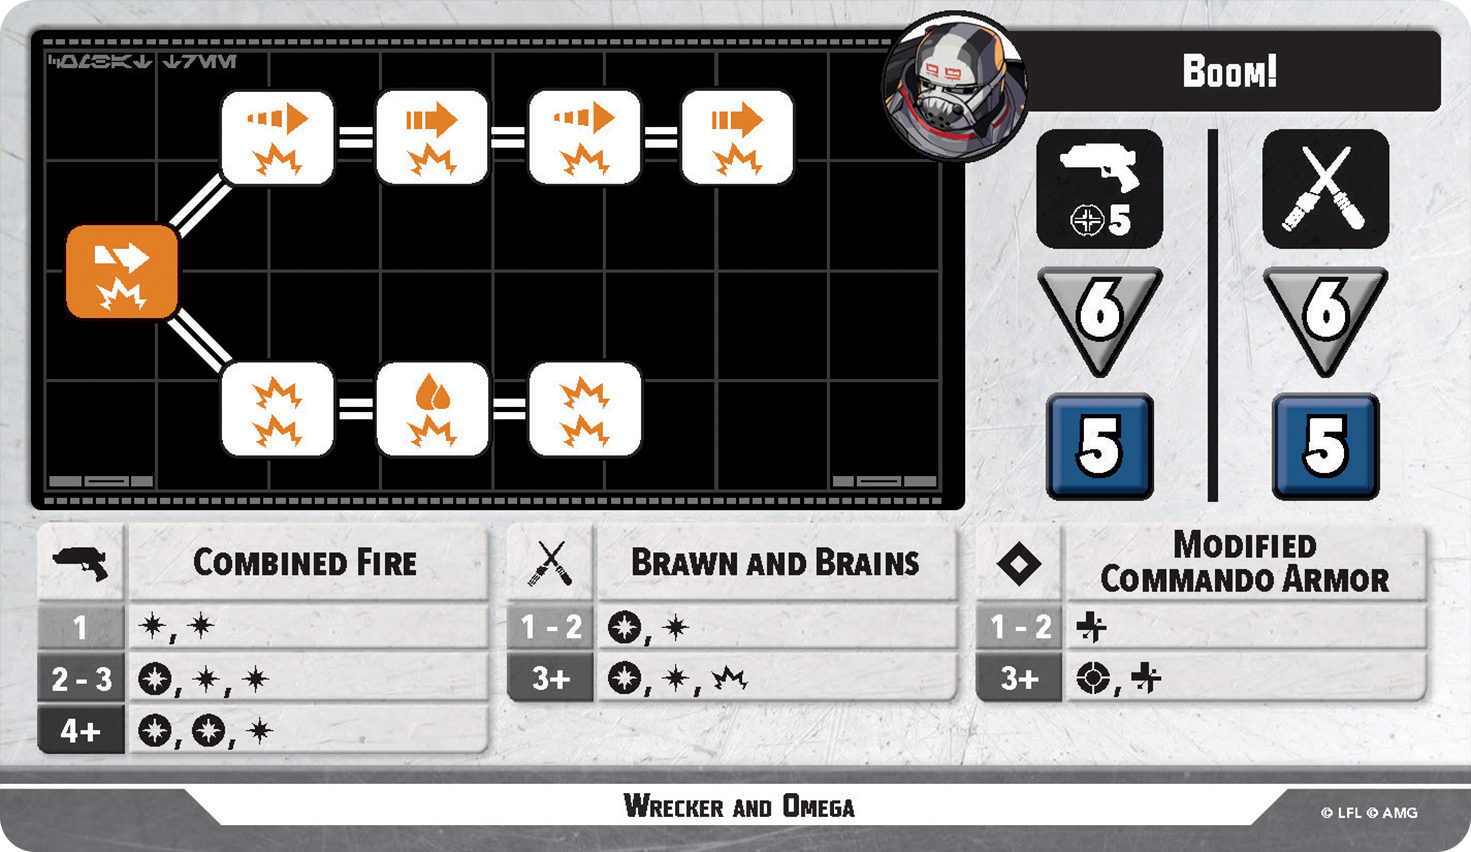
Boom! is their more offensive side. It's the side I, and most people, tend to spend most of the game on.
It starts off with six attack dice for both ranges. Now, that's not a lot, but considering you have access to a potentially second attack and five unblockable damage, it's not bad. You also do not need that many successes to move down the tree, but we'll get there in a moment. The ranged expertise on this side is fairly good. Two strikes at one is solid, but I think I would prefer a single crit to be honest. Their two or three level is great with one crit and two strikes. Four or more is their best spot with two crits and a strike. I feel like they're right on the cusp of having very good crit generation, but the chart is just short of being amazing. With Hunter's identity, you can pretty freely choose which level you want to be at when you attack. There's a lot of math involved that I don't exactly know, but it also depends on what your opponent rolls. Let's say your opponent rolled just two blocks and you rolled just three expertise and one failure. It's in your best interest to just change that failure to a strike instead of an expertise. You'll net more successes that way. Now, if your opponent rolls three blocks, you're better off moving up to the fourth level since you'll net more successes that way. It's all quite a bit roll dependent. Their melee expertise is decent on this side too, you get at least one crit at each level and an additional damage at three or more. They prefer shooting, but you're okay if you need to punch.
The combat tree is both very interesting and good. It tops out at a potential six damage off of four successes. If you go the bottom route, you get a pin and strain in addition to six damage. For me though, the top route is what it's all about. A pin, five damage, two shoves, and two dashes is nuts! I love this tree so much. It makes them feel very mobile and allows you to move their aura around the table pretty freely. The pin in addition to two shoves is also a great way to push something somewhere and tell them to stay.
Defensively, this stance is...fine. Five defense dice is not a bad place to be and they have access to protection if they're not wounded. The expertise chart is straight awful though. At least they get a heal at one and two but no blocks hurt. The nice thing is, with a heal at each level, your opponent needs to do at least three or more damage to get anything to stick. One will go to protection, one will get healed almost always. So, that's a nice little plus. However, if you think you are going to be defending a lot, you need to switch to Tuning Out Distractions.
Tuning Out Distractions
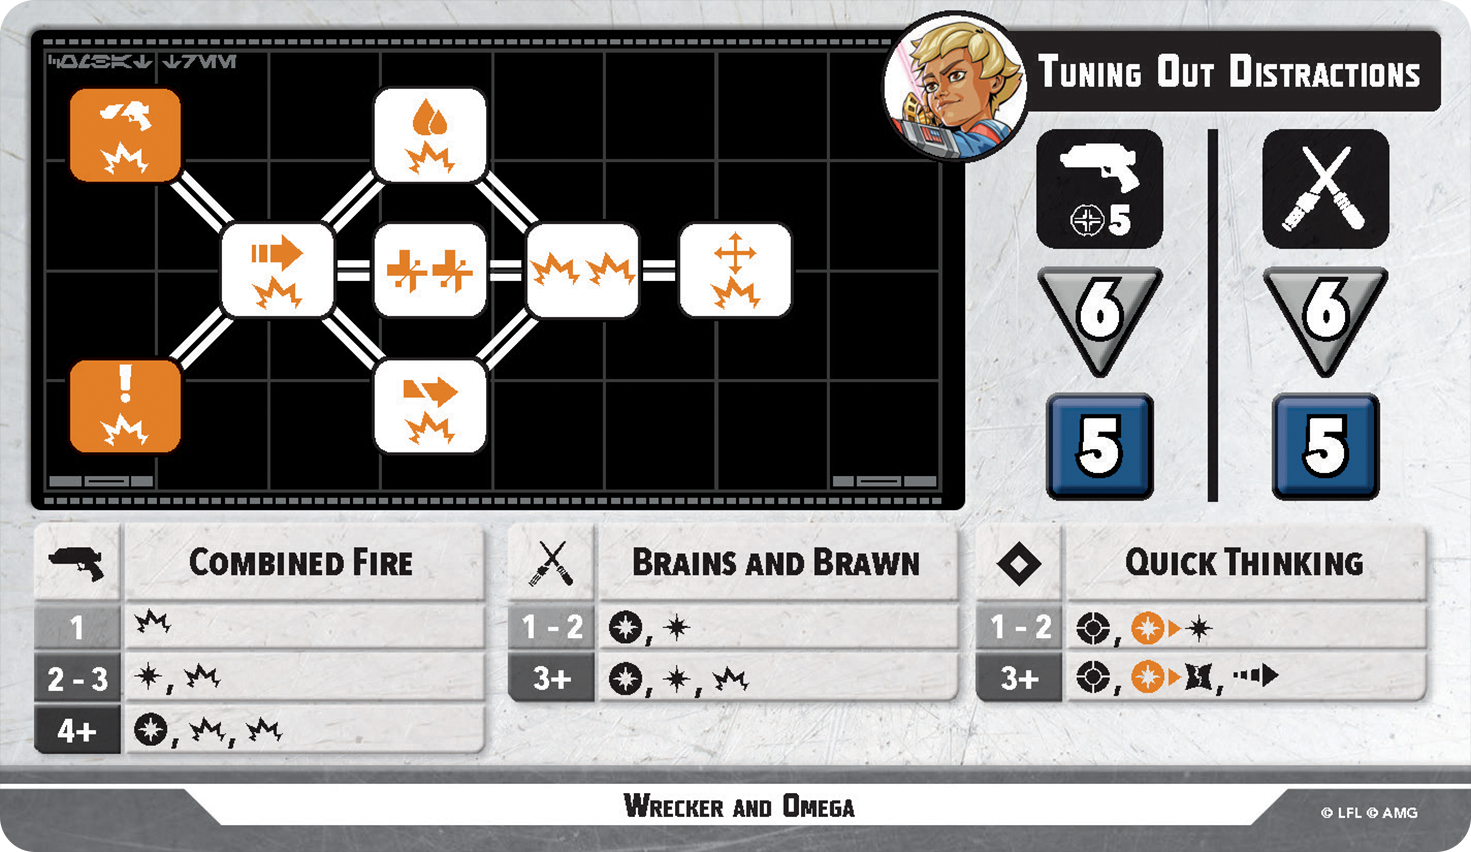
Tuning Out Distractions is their more effects/defensive stance. I have only attacked while using this stance a handful of times, mostly for the shove on two and the heals on three. The big thing here is swapping when you are going to be defending a lot.
The dice suite is the same as Boom! The ranged expertise is not super hot. I have not made a ranged attack on this side yet, and it will probably stay that way forever if I can help it. No crits until four or more expertise is rough. Extra damage at each level is okay, but I would prefer a strike or even an extra move/condition to be honest. With that said, because of the expertise, they can potentially top out at TWENTY-ONE damage in one activation (It's not that common, so don't rely on it). Their melee expertise is actually not bad. It's the same as Boom! so it can get some work done when you need it to.
The combat tree is the second most important part of this stance. It gives them access to all sorts of effects and conditions. It tops out at the same amount of damage as Boom! with upwards of six. Since it has the same damage output it allows you to think more clearly about why you're on this side. If your answer is not for a shove on two, heals, the repositions, or defense then you're on the wrong stance. Overall, the tree is okay. Being able to do two conditions of your choice is nice but not really why you're here.
Defense is why you're here. Oh my god, Omega defends so much better than Wrecker. It's not even close. A block at both levels is a nice start but once you get to the crit mitigation and free move, you're in a good spot. This expertise is significantly better than Wrecker's. If you think you'll be defending more than once or maybe twice in between activations, and can swap to this side, you'd be a fool not to. I generally try to end their first or second activation on this side, whichever act ends with me closer to the fight. It can be a bit tough sometimes since you really don't want to be attacking on this side as much.
Tactics
Let's discuss a few things that are not really within the bounds of the other sections.
I am going to start by reiterating that if you have Hunter, you need a VERY good reason not to have Wrecker in his squad and within three of him at almost all times. Protection and Steadfast are incredibly valuable for Hunter.
I also almost always use Hunter's tactic on Wrecker in order to get him closer to the opponent so his first Bulldoze is not useless. This also means reserving Wrecker fairly often, which I don't feel too bad about. Except against Moff Gideon.
Since they're on a 50mm base, Wrecker and Omega are also very good at body blocking. Whether it be an ingress point or a small corridor or whatever. They can block stuff all day long and with Steadfast, they won't be moving any time soon. With that said, there is a very rare occasion where the 50mm base is actually a bit of a hindrance to them. Since you are not allowed to overhang terrain, they can sometimes have a tougher time fitting where other units would.
Squad and List Ideas
I think Wrecker and Omega could fit in a bunch of different lists, to be honest. I have only used them with Hunter so far, but I could see an argument for them in scoundrel-based lists without Hunter or other Republic units. These first two come straight from my Hunter article:
Defensively... Offensive?
Primary: Clone Sergeant Hunter
- Secondary: Wrecker and Omega
- Support: Echo and Tech
Primary: General Obi-Wan Kenobi
- Secondary: CC-7567 Captain Rex
- Support: Republic Clone Commandos
This has been my most successful list with Hunter in it. The option to have Hunkers on Hunter, Wrecker, and Techo in melee is incredible and has made all of them feel almost impossible to kill. With how many extra abilities and actions they can get during their activations, I have not felt too bad about Taking Cover with them fairly often. Rex does Rex things, most notably, giving out heals when the Batch Take Cover and potentially giving Hunter a Dash + Hunker. I think the commandos could be ARFs if you want, but this list for me is out of a premier list where the ARFs are in another squad.
Business is BOOMIN'!!!
Primary: Clone Sergeant Hunter
- Secondary: Wrecker and Omega
- Support: Echo and Tech
Primary: Hondo, Honest Businessman
- Secondary: Jango Fett, Bounty Hunter
- Support: ARF Clone Troopers
This list is a lot of fun. I think right now, it is one of the only lists where Hondo actually works. Give the Batch or Jango some extra dice -> kill something -> shove them away -> take no strain ->???->Profit. I think there might be a small argument for Cross over Jango here, but since Cross is not a Scoundrel it's a bit of a tough sell for me.
This is... Actually Kinda interesting?
Primary: Hondo, Honest Businessman
- Secondary: Wrecker and Omega
- Support: MagnaGuard
Primary: The Mandalorian
- Secondary: Chewie
- Support: Bounty Hunters
Okay, hear me out. They're almost all scoundrels so they benefit from both Wrecker's protection and Hondos identity. Chewie and Magnas add to that by giving out Cover to the Primaries and Secondaries. Mando and Hondo have reactive repositions. Hold on, I think I'm cooking.

Overall, I think Wrecker and Omega are one of the best Republic Secondaries we have and maybe only second to Rex. I am having a hard time leaving them at home lately, even more than Hunter, which is saying something. I have a suspicion that they will find their way into many different lists for a long time.
Thanks for reading!