Hammerhead Corvette

Have you ever thought "Hm, this space battle would be a whole lot easier if I could just forgo shooting and smack my opponent in the face."? Well, have I got some news for you... The Hammerhead Corvette allows you to do that exact thing! (Assuming you don't get blown up by the time you reach your enemy) I've found these little guys to be pretty swingy. Either they fly like cruise missiles and drop enemy ships like flies or they get blasted out of the sky turn 2. Hopefully, I can help you figure out how to do the former.

Alright, Where do these sit with each other and the rest of the Rebel fleet? Well, for starters they both have 5 hull which is nice for a small ship. Puts them in line with Gladiators, Peltas, and Hardcells. The extra hull lends itself to the thematic use of these ships which was ramming. The shields are not super good so make sure to avoid getting shot more than once. These things have trouble surviving. Their token suite is okay. Evade to help the approach, Redirect to keep damage off your hull, and Contain to make sure damage that does go through is face down. Their nav charts are pretty good, slightly worse than a raider at speed 2 but still agile enough to fly circles around larger ships.

1/1/2 Command, squad, and engineering are average for a small ship. 1 Command allows you to do what you need when you need it. However, you're not going to be commanding squads, and most of the time you'll be dead before you have time to repair. Confire and Nav are your friends.
Their dice are pretty good with the Torpedo's single rainbow in its front, 1 black on each side, and nothing in the back. The Scout has 2 red and 1 blue front, 1 blue on each side, and an empty back as well. They arent going to be one-shotting anything but that's not really their job anyway. They want to swarm and kill your opponent's big ships by way of a thousand cuts. Force them to overspend their defense tokens and then take advantage of it.

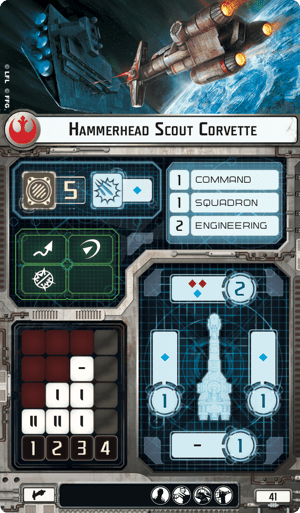
- 41 Points
- 5 Hull
- 2/1/1 Shields
- 1 Command, 1 Squad, 2 Engineering
- Evade, Redirect, Contain
First up we have the Scout variant. This is the longer-ranged version that likes taking it slow and jousting. It looks pretty similar to the Cr-90a and while they have similar roles they're just different enough to warrant thinking about the Hammerhead. The Cr-90 has a more consistent damage output and tends to survive longer, but also tends to be built more expensively. If you need to cut costs this ship is a good way to do it.
- Officer
- These ships will die. Most of the time it is more beneficial to not put an officer on them. Save the points for a ship that will last.
- Hondo is the exception.
- Offensive Retrofit
- The same can be said here, it will die. Use points wisely and accordingly.
- Weapons Team
- Ordnance Experts if Sato, but even then it's a tough sell.
- There is a very nice exception to both this and the Off Ret: Boarding Teams.
- Cham is one of my absolute favorite cards in the game and he loves hitching a ride on these guys.
- Shriv can also put in some crazy good work. Target PDIC, ECM, Thermals, ETC.
- Turbolaser
- Slaved Turrets is your friend. Cheap and effective. These ships want to be far away acting as a sniper so most of the time your 1 blue sides will be unused.
- LTT can be put in nearly every turbo slot in the game and function well. It does get a bit pricy though.
Okay, so a huge thing you have to understand and accept. Your Hammerheads will die. There's just about no way to avoid it. Accepting that is the first step to using these to better effect. Load them lightly, and shoot as much as possible.
Torpedo time!
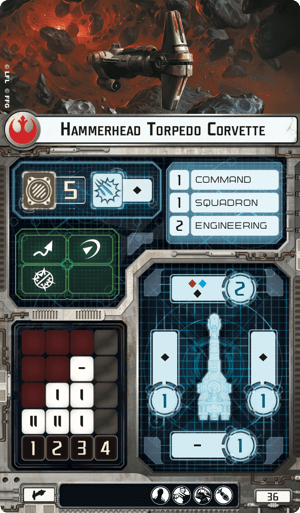
- 36 Points
- 5 Hull
- 2/1/1 Shields
- 1 Command, 1 Squad, 2 Engineering
- Evade, Redirect, Contain
The cheaper and more popular version is the Torpedo variant. 5 points cheaper, yet arguably more effective off the bat. Very similar yet it serves a whole different purpose. With a single rainbow in the front arc, it can technically shoot at long range, but it really shines at close range. 1 Black dice sides are generally pretty useful when it comes to getting in close and double arcing. Since it's only 1 die most people will not want to spend tokens on it.
- Officer
- You. Will. Die. Stay away.
- Hondo is the exception.
- After some thought, I will say: Lando Officer is actually an okay choice if you're running one Hammerhead. Lando, Cham, Rax, and Garel's Honor are the shit. You're still gonna die though.
- Offensive Retrofit
- The same can be said here, it will die. Use points wisely and accordingly.
- Weapons Team
- Ordnance Experts if Sato, but even then it's a tough sell.
- There is a very nice exception to both this and the Off Ret: Boarding Teams.
- Cham is one of my absolute favorite cards in the game and he loves hitching a ride on these guys.
- Shriv can also put in some crazy good work. Target PDIC, ECM, Thermals, ETC.
- Ordnance
- External Racks is the only choice here unless you are Sato
- If Sato, then ACM or APT are acceptable.
This is my preferred variant. I like to run it fast. Get in, pop rax, die. Easy peasy.
Titles time!
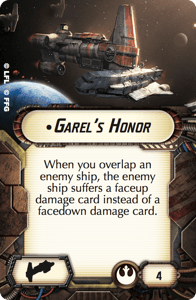
Oh my lord. Garel's Honor is the love of my life. It is so much fun to ram your opponent watch their face as they pull structural damage or projector misaligned. If you're lucky you can park halfway on the station and keep giving your opponent damage while taking none. This title can fit in nearly any fleet. It serves well with lone wolf Hammerheads. Pairs excellently with Dodonna.
The next two titles are a little bit different. They are essentially group titles. You should only use these titles if you have 3+ Hammerheads in a list.
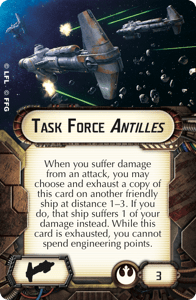
Task Force Antilles, otherwise known as TFA, is the more expensive of the two options. It requires that you exhaust a copy on another Hammerhead at a distance of 1-3. Make sure you keep all your buddies close by. This is the one I've seen and used less. It is designed to keep your Hammerheads alive longer by essentially spreading the damage around to the others in the group, but once it's exhausted you cant spend engineering points. That stipulation is useless because you shouldn't be spending engineering points with Hammerheads anyway. While this can help keep the group of Hammers alive longer, I am unsure how good it really is since they like to die very quickly anyway. 3 Points is also a bit pricy as it comes out to 9 points total over a group of 3. This title gets better the more you bring though.
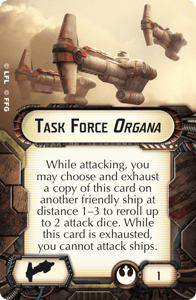
Task Force Organa, on the other hand, is a great use of points! Coming in at 1 point means with a group of 3 you're only spending 3 points. Once again, keep your buddies nearby because you have to exhaust the card on another ship to use its effect. The stipulation on this one is a bit harsher. Not allowing you to attack ships can actually make a huge difference. Usually, I'll try to just accept whatever rolls I get from my first ship's attacks, and from then on it's easy to exhaust. Ship 1 Attacks (No Exhaust), Ship 2 attacks (Exhausts Ship 1's card)-> Ship 3 attacks (Exhausts Ship 2's card), or something along those lines. This title is super handy considering Ordnance experts are 4 points and Veteran gunners are 5. \
BUILDS:
Baseline
Hammerhead Torpedo Corvette (36)
• External Racks (4)
• Task Force Organa (1)
= 41 Points
This ship is cheap, easy to use, and should be taken in groups of 3+. Fly as fast as you can in, drop rax, TFO reroll if needed, Fly away or die trying.
Sato's Sledge
Hammerhead Torpedo Corvette (36)
• Ordnance Experts (4)
• Assault Concussion Missiles (5)
• Task Force Organa (1)
= 46 Points
You can also take disposable capacitors with this, but that gets a bit expensive coming in at 147 for 3 and with Sato, you need to save points for squads. Using Sato at close range you can get 3 black dice which, with two forms of rerolls, usually gets you the crit you need to pop ACM.
Baseline Sniper
Hammerhead Scout Corvette (41)
• Slaved Turrets (6)
• Task Force Organa (1)
= 48 Points
This is the base scout for me. Fly them slow and away from the brawl. Snipe with 3 red and reroll with TFO as needed. Pretty straightforward. Don't let the enemy flank you, you will explode.
Um?
Hammerhead Scout Corvette (41)
• Gunnery Team (7)
• Disposable Capacitors (3)
• XI7 Turbolasers (6)
• Task Force Antilles (3)
= 60 Points
Okay, well I wanted two builds for each variant. I threw this together. If hammerheads didn't die so fast then I would say a group of these would be able to put some major hurt into your opponent. 6 long-range shots spread around with Xi7s can do serious damage. 180 points down the drain though...
CHAMMERHEAD
Hammerhead Torpedo Corvette (36)
• Lando Calrissian (4)
• Cham Syndulla (5)
• External Racks (4)
• Garel's Honor (4)
= 53 Points
This is my baby. I love this ship with my whole heart. Yes, sure, it likes to die on me, but that saves a shot or two from coming in at my big ships. Arguably better, if your opponent does underestimate/ignore this it will punch up by a large amount. You can do without Lando if you want, but he really does help its survivability. This is also my choice for Profundity every. single. time. Cham has the capability to completely ruin plans with no forgiveness. The honor part of Garel's Honor is honorably ramming yourself and your opponent to death.
While the Hammerhead gets a bad rap, I think it can be really good in the right hands. It takes a lot of practice to get them to work so don't feel disheartened if the first times you field them they die before even getting a shot off. They can put large amounts of damage to your opponent and punch way above their weight if flown properly. Keep them cheap, Accept that they will die, and move on once they do.