Objectives: Yellow (Wave 1)

Objectives are one of the main game mechanics for Armada and choosing the right one can sometimes be a huge brain melter. The objectives that are used are the ones that the second player brings. The first player gets to choose from all three of the second player's objectives. Sometimes the fleets match up perfectly and sometimes they don't. Second players can get their objectives flipped around on them if the first player's fleet happens to fit well and they know what they're doing. Most of the objectives can be competitive with the right list and with the right setup, some of them are just really stupid fun.
There are 3 different colors/styles of objectives and you need to bring one of each for every fleet. Red(Assault), Yellow(Defense), and Blue(Navigation).
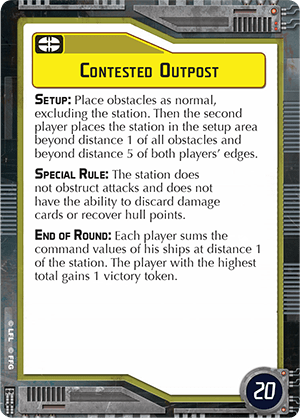
Contested Outpost is one of my absolute favorites and has been since day 1. I love this objective. It is generally easy to use and can be very effective if used well.
Setup: Place obstacles as normal means the second player still gets to place first. Still use the normal three asteroid fields and two debris fields, but exclude the station until after all other obstacles are placed. The second player then gets to place the station within the parameters. The first player gets 2 total obstacles and the second player gets 4 total.
Special Rule: The Station does not obstruct attacks and is pretty straightforward. I think they made that the case because so much of the fight is centered around said station that nearly every attack would be obstructed. It also does not heal ships or squadrons, I assume for the same reason as stated before.
End of Round: At the end of each round sum the total number of command dials per ship at distance one of the station. The person with the highest number gains a victory token. This objective lends itself to large ships that generally have higher command values. It is easier to fit one Starhawk at distance 1 of the station than it is to fit four CR-90s. Another tip I might add is that this objective is very good for getting your opponent where you want them to be. This, like some other objectives, has a location-based scoring system that allows you (and your opponent) to know exactly where each other will be heading off the bat. This can be extremely helpful if you have, let's say, an Ackbar fleet where you want your opponent to be in your side arcs as much as possible. You can use the station to coerce your opponent into being in the perfect spot to get sideswiped by Ackbar or even Ackbar Slashed. It can also be considered for squad fleets with slower squads for the same reason. To know where your opponent will be at any given time is a huge advantage, but do be wary since they will know where you're going to be as well.
Lists and Ships that work well: As stated above, lists, where it will greatly benefit you to know where your opponent will be, are to be considered. I know that every list would benefit from that knowledge but not every list can use the benefit the same way, especially considering with this objective your opponent will get the same benefit. Your goal is to gain more than they would. That was a bit of a redundant tangent, back to the main topic here: list and ships. Starhawks, SSDs, and anything will a 3+ command stack are your main contenders here. I would also suggest bringing a smaller 1-2 command ship to swoop in and help you break any ties with your opponent. Mc30s, Gladiators, and anything that has a 2 commanded stack and can go speed 3+ is ideal. CR90s and Raiders are okay but not the best.
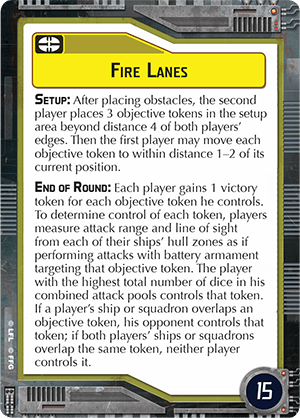
Fire lanes is also a very fun objective to play. It is used very frequently by lists that have access to large dice pools and strategic squads.
Setup: After placing obstacles the second player gets to place three objective tokens in the play area within the parameters. Once this is completed then the first player may move said tokens within distance 1-2 of their initial location. This is most beneficial to the second player, but the first player gets the benefit of moving them however they'd like within the parameters. This stipulation might make you want to place the tokens in a sub-optimal initial way to force the first player to move them to your ideal area, but I assure you they would rather move them to an extra suboptimal location instead. If both of you get no benefit from the objective then they gain a distinct advantage over you. All that to say: place the tokens where you want them to be and hope your opponent doesn't mess you up too much. Also of note is the fact that, yes, you may initially place them one on top of the other in a group or on obstacles or both. This is also before deployment happens so you do have the chance to counteract your opponent's replacement but adjust your deployment accordingly.
End of Round: There is a lot to unpack from this objective so I am going to do it in parts.
"Each player gains 1 victory token for each objective token they control..." Easy enough to grasp.
"...To determine control players measure attack range and line of sight from each of their ships' hulls zones as if performing attacks with battery armament targeting that objective token..." This is from all eligible hull zones. This does include range, obstruction, or any other effect your ship has on it. For instance, the damage card Depowered Armament states "you cannot attack at long range." This does mean that if the objective token is at long range from a ship with that card faceup it may not target that token. You also may not include dice added by effects like Admiral Akbar or External Racks. On the flip side, you may include dice from cards that increase better armament. Spinal Armament, Enhanced Armament, Expanded Launchers, etc. It is possible to build a fleet around adding dice to your fire lanes eligibility, but I would advise you to build your fleet first and then choose fitting objectives.
"...The player with the highest total number of dice in their combined attack pools controls that token..." This is also pretty straightforward. The player who has the most eligible dice for each token wins control of that token. This does not mean most possible damage, nor does it mean who rolls the best against the token. It is just who has the highest number of dice.
"...If a ship or squadron overlaps the token the opposite player gains control of the token. If both players' ships or squadrons overlap the same token, neither player controls it." This rule always seems weird to me ill be honest. If you overlap an objective token with a ship or squadron it is given to your opponent. This rule does allow you to do some funky things though. You can use one of your strategic squads to move a token under your opponent's ship to score it.
Lists and Ships that work well: Strategic. Strategic. Strategic. I cannot stress enough that if you are going to bring this objective then you have to either bring strategic squads or have a very good plan on how to deal with your opponents should they bring them. It helps to bring ships with large battery armaments like Starhawks, ISDs, and anything with 6+ dice, preferably red dice to make sure you're getting decent dice numbers at any range. Squadron heavy fleets do not work well since squadron armaments do not matter with this objective and usually, carriers have small batteries. MSU is an option since a lot of smaller batteries can equal or surpass 1-2 larger ones, but it is harder to get them in the right position to score. Use strategic squads to move the tokens around and gain maximum advantage from doing so both with 1-2 large ships or 3+ smaller ships.
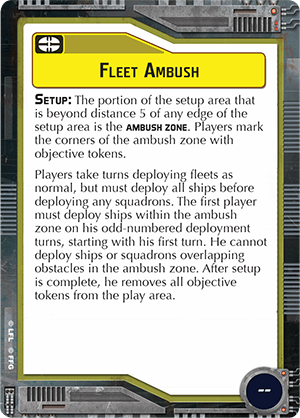
Fleet Ambush is probably one of the only objectives I would strongly advise against using. It can be turned on the second player very easily. There is a joke around that the ambush is actually the first player ambushing the second player as opposed to the intended opposite.
Setup: Set up a rectangle where all the sides are distance 5 from each edge of the setup area. This is the Ambush Zone. Take turns deploying as normal but both place all ships before squads. The first player must deploy in the ambush zone on their odd-numbered deployments including and starting on the first one. They cannot deploy overlapping obstacles.
There are numerous reasons why fleet ambush is not a good choice, that is unless you have a very specific plan and have a lot of practice playing it out. The first reason I'll mention is that with the ambush zone the first player is able to deploy their ships and squadrons much closer than usual and are able to activate first giving them the distinct ability to wipe something off the board at the very top of the game. Getting a face full of bombers and losing one of your main ships to them on the first activation of the game is not a good time. The next reason is a smaller one but it also negates much of the bad deployment disadvantage on their part because they'll be so close that fixing issues in deployment will be easier.
Lists and Ships that work well: Once again, do not bring this objective. If you absolutely must bring this objective for some reason then I would suggest bringing it with longer-ranged ships that can deploy far away from the ambush zone. On the other hand, If you're using a squadron heavy fleet or a fleet with black dice missiles and your opponent brings fleet ambush I would highly suggest picking it and showing them exactly why it should not be considered.
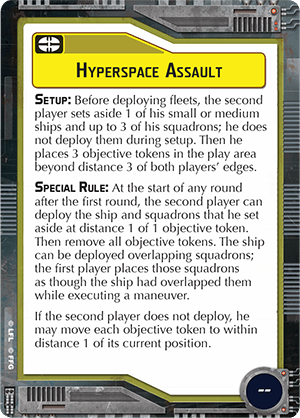
Hyperspace Assault is an absolute banger of an objective. I mean I absolutely adore this card. It is so much fun and can be incredibly effective.
Setup: Before deploying fleets the second player sets aside 1 small or medium ship and up to 3 squadrons. Usually I only ever set aside a ship, I don't think I have ever used this objective with squads since they are extra important for deployment advantage lost by setting aside a ship. The second player then places 3 objective tokens within the parameters. This is before deploying fleets so generally, I would recommend trying to be as flexible with the tokens as possible.
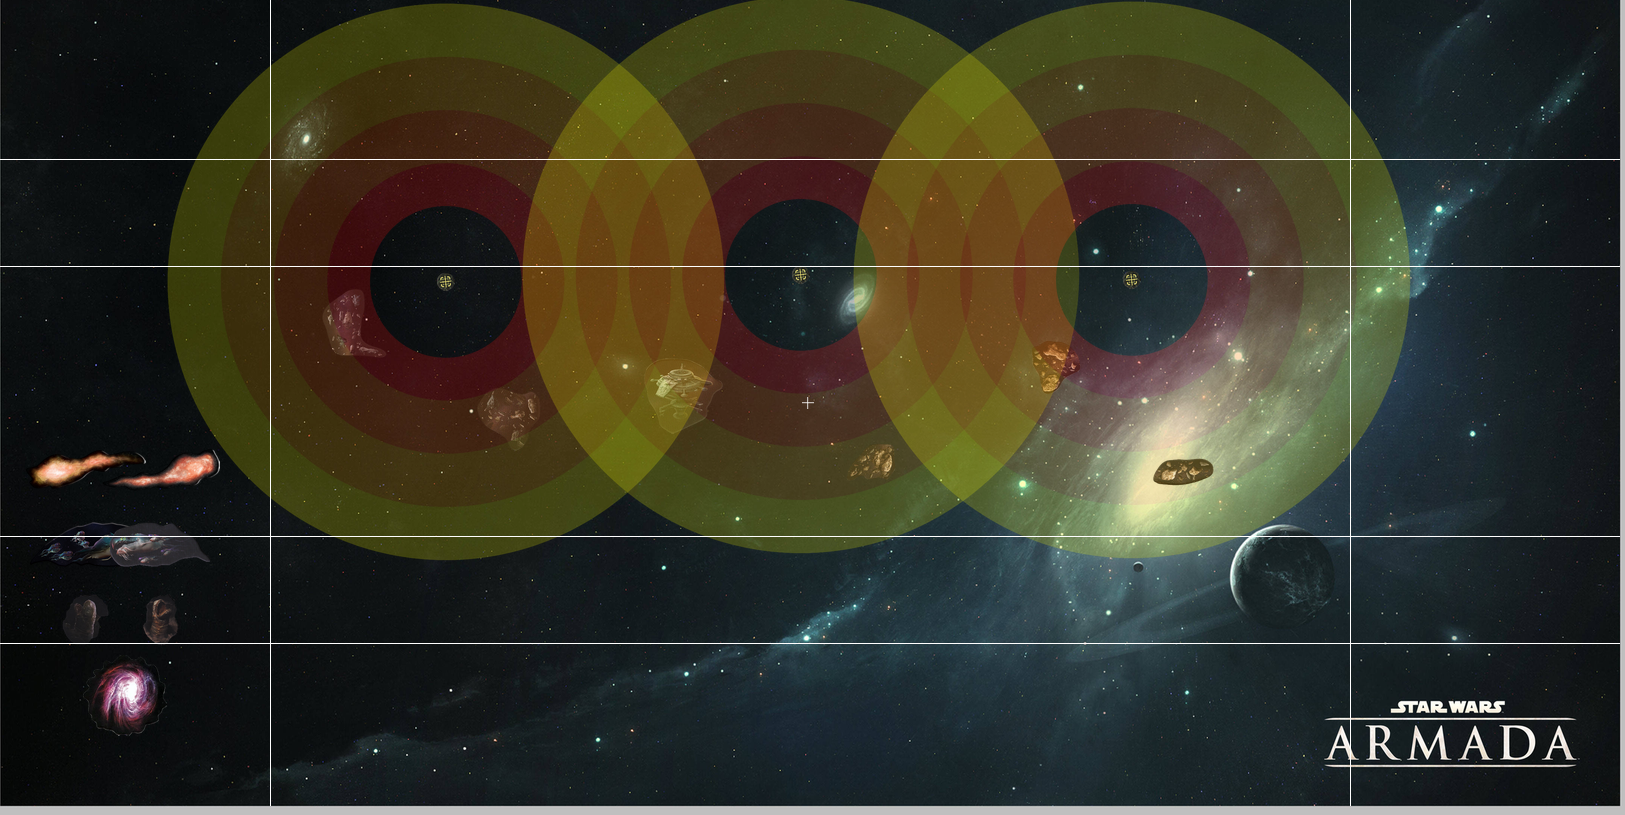
This is about as flexible as you can be without knowing where your opponent will deploy. Sometimes you can use the obstacle placement to extrapolate enough info to change the token deployment, but that is rather rare in my experience.
Special Rule: At the start of any round after the first, the second player may deploy the ship and squadrons they set aside at distance 1 of 1 objective token. So you can't do it turn 1 but that's largely a non-issue. AT distance 1 means you can have just the absolute tiniest sliver of your ship at distance 1 and you will be legal. If you can swing it the optimal placement of your ship would have it close-range double arcing 2 or more ships. Since the first player does get to activate first you have to be careful that your opponent cannot fly away before you get to destroy them. If you can pull off double arcing 2 or more ships then regardless of which they move you will have a good shot on the other. The main contenders to be put in hyperspace are ships that would be high-profile targets for your opponent. Ships that would probably be focused down before they got to their effective range, fragile, hard-hitting black dice ships mostly. If you do not deploy at the top of a round you may move the objective tokens within distance 1 of its location. This allows you to keep your token placement relevant to the fight, there is an argument to be made for bringing a strategic squadron to help move those tokens, but I've never had an issue getting the tokens to where I need them to be without one.
Lists and Ships that work well: MC30s, Gladiators, Hammerheads, Raiders, etc. Small cruise missile ships that would strongly benefit from the perfect placement. I have personally never used a medium ship with this objective but that's because I'm a rebel main and the Assault Frigate is not really a good choice for this objective. I could see Acclamators and Victorys working decently if you load them up with short-range upgrades. I would probably not use Cr90s, Arquittens, Hardcells, CR70s, or stuff like that. This is a flexible objective if you have any number of small/medium combat ships. I have used it with 7 ship MSU lists and I've used it with a squadron heavy fleet that has one MC30 in it, both worked fantastically. Specifically with the former, having more eligible ships for hyperspace gives you a unique amount of flexibility to choose the optimal ship for your matchup.