Objectives: Blue (Wave 1)

Objectives are one of the main game mechanics for Armada and choosing the right one can sometimes be a huge brain melter. The objectives that are used are the ones that the second player brings. The first player gets to choose from all three of the second player's objectives. Sometimes the fleets match up perfectly and sometimes they don't. Second players can get their objectives flipped around on them if the first player's fleet happens to fit well and they know what they're doing. Most of the objectives can be competitive with the right list and with the right setup, some of them are just really stupid fun.
There are 3 different colors/styles of objectives and you need to bring one of each for every fleet. Red(Assault), Yellow(Defense), and Blue(Navigation).
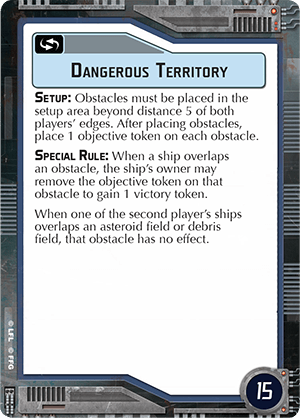
Dangerous Territory is a fun and solid objective. It's not easy for this one to get turned around on the second player.
Setup: Obstacles must be placed beyond distance 5 of both players' edges means that the obstacles are liable to be more clumped together than with usual placement. Place an objective token on each obstacle. Not much to be said here, it's pretty straightforward.
Special Rule: When a ship overlaps an obstacle, the ship's owner may remove the objective token on that obstacle to gain 1 victory token. This is one of the simplest special rules and objectives in the game. Overlap obstacles, remove tokens, profit. Second players' ships ignore the negative side effects of overlapping debris and asteroid fields, but still gain the bonus from overlapping the station. This is the real bonus that the second player gets. The first players' ships still take damage when overlapping those obstacles which mean they have to think twice before going for an objective token. Use this to your advantage. Try to place the station in a beneficial way for yourself and then place the other obstacles in a way to get the most benefit from your opponent overlapping them. Have a lot of APTs in your fleet? Try and force your opponent to overlap asteroid fields. Have Xi7s around? Debris fields.
Lists and Ships that work well: Fast small ships work best. MC30s, Cr90s, Raiders, etc. Anything that can jump on top of an obstacle as soon as you can. They don't necessarily need to be small ships but since you'll be jumping ahead to the fight rather quickly you might want to hide on obstacles while you can. This objective can work solidly with nearly anything, I'd lean away from lists with fewer ships and ships on the slower side since you'll want to snag as many tokens as you can as fast as you can. If you manage to get all of the victory tokens that's 90 extra points!
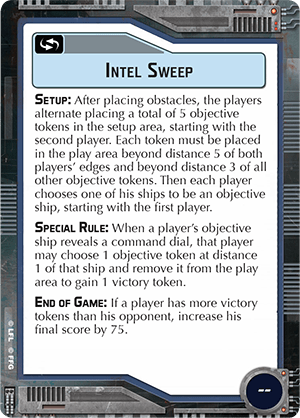
Intel Sweep is, in my opinion, the quintessential strategic objective.
Setup: After placing obstacles means before deploying ships. You will have an idea of where the tokens will be while deploying so that is handy. Players alternate placing 5 objective tokens in the setup area within the given parameters, starting with the second player. This means the second player gets to place 3 tokens while the first gets to place 2. Then both players pick objective ships starting with the first player.
Special Rule: When a player's objective ship reveals a command dial they may choose 1 objective token at distance 1 of that ship, remove it from the play area, and gain 1 victory token. This is pretty simple to grasp. Try and grab tokens as fast as possible and before your opponent. Since you can only grab 1 per turn you need at least 3 turns to secure the objective. Make sure to keep your objective ship alive or else you will not be able to claim tokens.
End of Game: The player with the most victory tokens adds 75 points to their final score! 75 is a lot of points.
Lists and Ships that work well: Strategiiiiiiiiiiic. Please please please bring at least 1 (2 is better) strategic squadron(s) if you have this objective. If you do not you will have this flipped on you and it will suck. It has happened to me a few times and for a while, it turned me off from this objective. If you plan it right, you can pretty much win the objective at the top of the game by using a series of squad commands, fighter coordination teams, and good token placement. As the second player, you get to decide where 3 of the 5 tokens will be which means you can place them in a very beneficial way for yourself. Use strategic squads to grab tokens so you can start scoring by turn 1. This objective can work with nearly any fleet. Make sure to have a plan for dealing with squads so they don't tie up your strategic homies. Ships capable of taking fighter coordination teams are a good choice and it is best to make sure your objective ship will survive. Either make it a hard to kill big ships or even better make it a flotilla hiding behind the big ship.
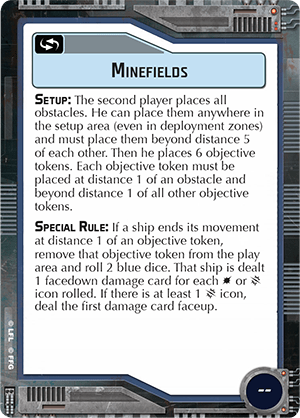
Minefields is fun. It can be extremely useful for more reasons than are immediately apparent.
Setup: The second player places all of the obstacles. That is the first and main reason I like this objective. Being able to completely control the deployment of the obstacles allows you to start controlling the potential engagement before ships are even on the board. Obstacles can be placed anywhere in the setup area including deployment zones, but they all must be beyond distance 5 from each other. Then place 6 objective tokens, each at distance 1 of an obstacle but beyond distance 1 of all other tokens. You can pull off all sorts of funky obstacle placement and token placement. If done correctly you can either force your opponent to run over the tokens, run over obstacles, or come right down a continent alley you made towards your fleet. You limit their choices off the bat, which can be very powerful.
Special Rule: If a ship ends its movement at distance 1 of an objective token, remove said token and roll 2 blue dice. Deal 1 facedown damage card to the defender for each hit or crit icon showing. If there is at least 1 crit icon deal the first card faceup. Facedown! (or faceup) Right to the hull of the defender. No shields, no defensive retros, just pure damage. DO NOT run over a mine in a ship with 5> hull. There are reasons why you may need to hit a mine in a bigger ship, but in smaller ships, you should do everything in your power to avoid them. I have had ships take 3 damage on a mine (Crit + hit + structural) and it does not feel good. Also, as the second player, the mines should be placed in such a way that if you're following your ideal deployment and game strategy you should not hit one the entire game. It is rather unfortunate to bring this objective to just blow your ships out of the water.
Lists and Ships that work well: Once again, this objective can fit with nearly anything. The obstacle and mine placement allow you to control the deployment of your opponent in such a way that a lot of different fleets can benefit. Special note here for Romodi. Objectives where you are the second player with a Romodi fleet and get to place all obstacles give you a huge advantage. Use the obstacles to line up those nasty RomOnager shots.
Superior Positions is one of the most fun objectives in the game. It is also the wave 1 squadron list blue.
Setup: The first player must deploy all of their ships and squadrons before the second player. The benefit here is pretty explanatory. If your opponent places first then you gain the benefit of knowing exactly how to deploy against them. The only way around this for the first player is Corvus.
Special Rule: After a ship or squadron performs an attack against the rear hull zone of another ship if the defender suffered at least one damage, the attacker's owner gains 1 victory token. This rule specifically lends itself to MSU (Multiple Small Units) and Squad fleets. The more attacks against the rear you can get, the more victory tokens you can get. Be careful not to let your opponent flip this objective on you. I know it seems like you'll get a lot of benefits but it is easy to overlook your opponent's plays and have them flip on you in 1 turn. Watch out for their squads, small ships, and anything that is trying to flank you. Don't overextend your ships just to gain points. When you do overextend you can count on your opponent to be there ready to eat up a lot of VPs.
Lists and Ships that work well: Squadron heavy fleets and MSU. Like I said before, the more attacks you have the better off you will be. Squadron lists are particularly good since usually, they will have fewer ships and more squadrons. That means more attacking and less defending. There is a tendency for newer players to bring this objective just for the deployment benefit, but do not do this. When you bring this objective you should have a clear idea in your mind about how you are going to benefit from the special rules/ how you are going to avoid your opponent from benefitting.