Objectives: Red (Wave 1)


Objectives are one of the main game mechanics for Armada and choosing the right one can sometimes be a huge brain melter. The objectives that are used are the ones that the second player brings. The first player gets to choose from all three of the second player's objectives. Sometimes the fleets match up perfectly and sometimes they don't. Second players can get their objectives flipped around on them if the first player's fleet happens to fit well and they know what they're doing. Most of the objectives can be competitive with the right list and with the right setup, some of them are just really stupid fun.
There are 3 different colors/styles of objectives and you need to bring one of each for every fleet. Red(Assault), Yellow(Defense), and Blue(Navigation).
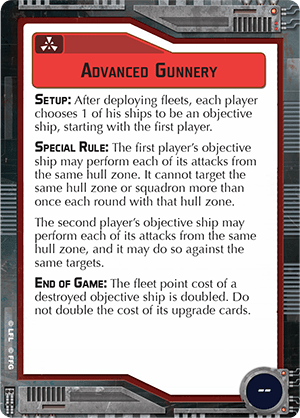
Advanced Gunnery is a very fun objective to play. Unfortunately, It can get turned on the second player easily.
Setup: After deploying fleets means you get to choose your objective ship based on how both of you deploy. This can be helpful if you have multiple ships that would like the benefit and you can pick one that has a better shot of maximum benefit. Most fleets I've used this with usually only have one ship that would greatly benefit so be careful to deploy it in a meaningful way.
Special Rule: First player's ship gets the benefit of being able to attack twice from the same hull zone but cannot target the same squadrons or hull zone on any one ship. The second player, however, gets to attack from the same hull zone and can target the same squads or hull zone.
This is where the objective pays off for the second player and why you would consider bringing it. This is also where I'll mention the fact that Advanced Gunnery has a tendency to be flipped around on the second player. What I mean by "flipped" is that the first player sometimes ends up getting more out of this objective than you might. This means the first player has the benefit of going first and the objective on their side. Assume you bring an MC80 with this objective and then you get to table one and your opponent has a super diced-up ISD Kuat. You're going to have a rough time if they can line up their shots.
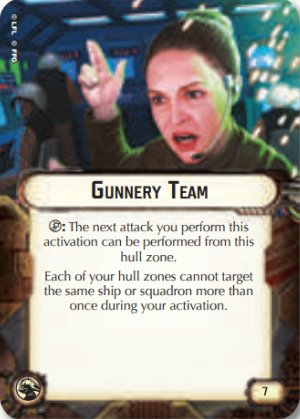
Do note that if you bring the weapons team upgrade card Gunnery Team, the cannot on that card negates the benefit of this objective. Most of the time I would argue that Gunnery Team is a more reliable choice to bring with a list rather than hoping your opponent will pick Advanced Gunnery.
End of Game: At the end of the game you tally up points and any objective ships that were destroyed are doubled in points. So target their objective ship and avoid getting yours killed. An interesting note here is that if you fly MSU and pick your opponent's Advanced Gunnery even without having a ship that would greatly benefit you will benefit greatly by getting double points on their ship.
Lists and Ships that work well: ISDs, MC80s, Venators, and essentially anything that has a lot of dice in one hull zone and not a ton of dice in their others benefit particularly well from this objective. Starhawks are iffy to me for some reason I can't quite figure out, they have 8 dice front and 5 in the sides so they're probably a pretty good candidate. I would say essentially anything with 6+ dice in one arc like it. MC75s and Providences would probably rather be double arcing and I'd steer away from using it with MSU or squad fleets because generally, they don't have powerful enough arcs to do a lot with this objective.
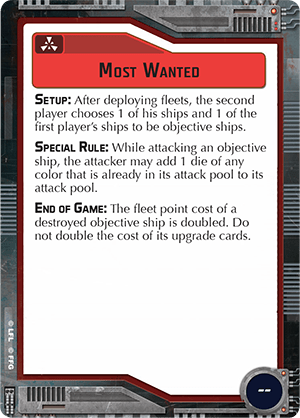
Most Wanted is one of my most used and seen objectives. It is super easy to use in nearly any fleet and generally ends up giving you a huge bonus both in the fight and at at end of the game.
Setup: After deploying the second player gets to choose one of their ships and one of the opponents to be the objective ships. After deployment is nice because it allows you to see what ships you might have the best chance of killing and which ones might be able to zip away. Usually, you'll want to choose your cheapest ship and your opponent's scariest ship or the most expensive (usually one and the same).
Special Rule: When you attack an objective ship you may add 1 die of any color already in the attack pool. Squadrons do not gain an effect from this objective, this card was one of if not the first errata in armada. If you have a 1 die arc and you are obstructed you get nothing either, since you may only add a color that already exists in your initial pool. This benefit really just is flat-out good. There's nearly no downside, except your opponent gets the benefit as well. That can be negated easily though.
End of Game: Just like Advanced Gunnery. Double the points of the killed objective ships(not including upgrades).
Lists and Ships that work well: MSU loves Most Wanted. The more ships you have the more ships that get a bonus while attacking the objective ship. Lists with 2-4 ships can still work well (there are better options for squad heavy lists though) but you will notice less of an effect tan 5+ ships. Usually, as a second player, you'll want to have a ship in your list that is relatively cheap to use as your Most Wanted sacrifice. Flotillas, Hammerheads, Raiders, ETC. Pairs really well with ships that have multiple colors of dice in their arcs so you can choose to add what colors you need. Blue if you need accuracy, black if you need damage, and red if you are at range.
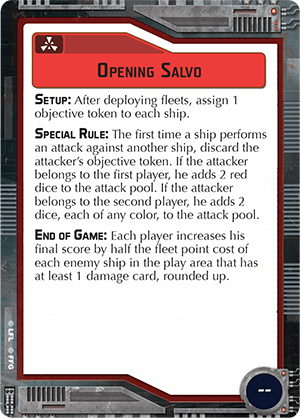
Opening Salvo is very fun, but I haven't seen it a ton recently. The benefit of adding dice to your first attack is really nice especially if you've got crit effects or just need flat our damage.
Setup: Not really much to talk about here since all ships that are on the table post-deployment (sorry Raddus) get a token you won't really gain any ground by seeing the deployment.
Special Rule: The first time a ship performs an attack against another ship you get to add some dice. The first player adds 2 red. The second player adds 2 of any color(s). The benefit is great! The downside of the first player getting 2 reds really hurts this objective in the competitive scene. This objective is really fun, but can easily get flipped on you/ you get about even benefit as your opponent does. I am personally on the team of this objective just not really all that great. It benefits your opponent in a really meaningful way that is hard to ignore. Sure, there are some really good matchups for you if you bring it but when it does go poorly you'll really wish you brought something else.
End of Game: Pretty straightforward stuff here. Add an additional half fleet points cost of each ship that has at least one damage card at the end of the game. I recommend you still try to focus fire as usual but you can also try to ram near the end of the game to get some damage on an enemy ship.
Lists and Ships that work well: MSU once again really likes this, especially with things like Sato or Akbar where you're doing dice shenanigans anyway. An Akbar Scout MC30 can potentially throw 10 dice out of its side! Assuming it's your first attack and you're at close range with ex-rax. Screed, Dodonna, and TF-1726 can all love this objective as well.
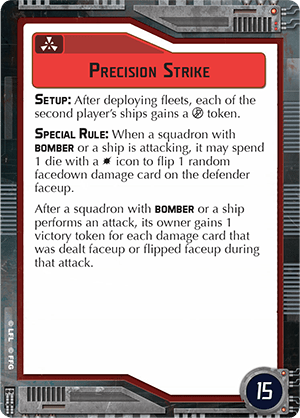
Precision Strike is the squadron heavy red objective from wave 1. It is a solid objective all around. I still see it a play it all the time.
Setup: After deploying fleets all ships belonging to the second player gain a concentrate fire token. Once again this does not include any set-aside Raddus ships.
Special Rule: Squadrons with Bomber or ships may spend 1 die with a hit icon to flip a random facedown card on the defender. The benefit here is exactly the same for both the first and second players. In order to benefit the defender has to already have at least one damage card on them. After a ship or bomber performs an attack you gain 1 victory token for each card dealt or flipped faceup during that attack. The reason I'm not fast to dismiss this objective is that even though the benefit is the same for both players, you really should only bring this objective with squad-heavy fleets. If you do you will have 2-3 times the amount of attacks that can benefit your opponent.
Lists and Ships that work well: Bombers. Lots of Bombers. In reality, you should only bring this objective if you're playing with 100+ points of squads most of which should have the bomber keyword. There is a slight argument to be made for MSU lists, but I'd still urge you to only use this objective with lots of bombers.
That wraps up the red objectives from wave 1! My favorite in this list is definitely Most Wanted, I use it in a lot of my current lists. There are 3 waves of objectives and I will be doing Wave 1 Yellows next!