The Hangar: TIE/ln Starfighter

Welcome to The Hangar, pilot! In this series we talk about starfighters, freighters, shuttles, racers, bombers, gunships, and everything else in between. This is the chance to look "under the hood," as it were, and explore what makes our favorite ships great.
"For every TIE fighter you shoot down, a thousand more will take its place"
-Baron Soontir Fel
Overview
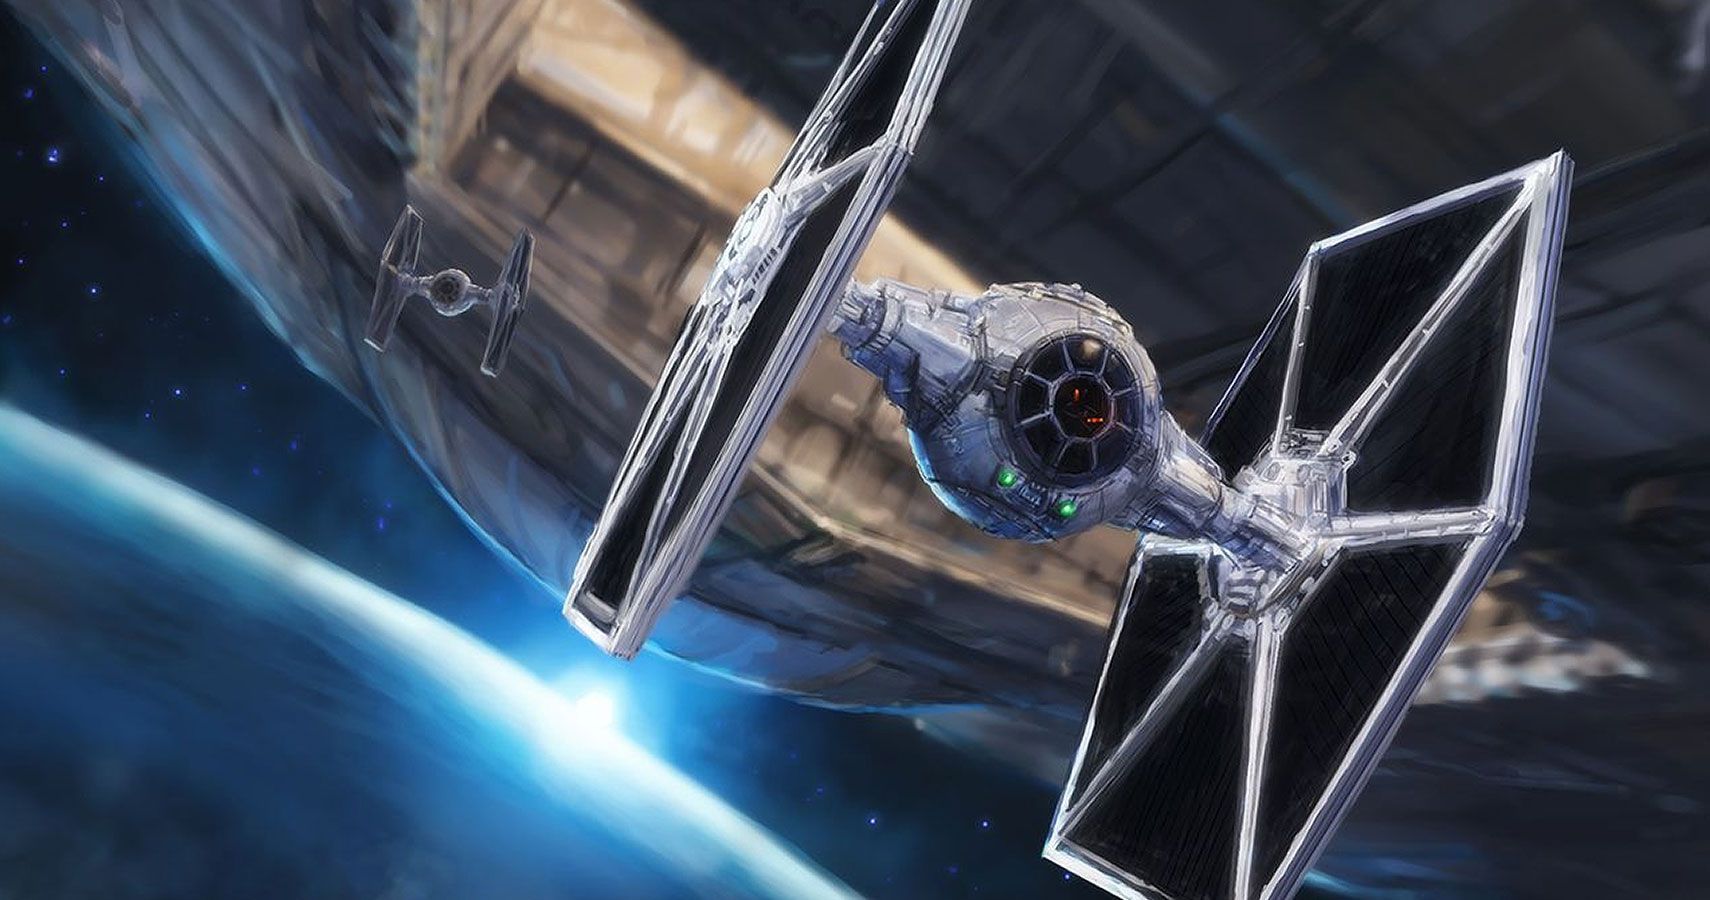
The TIE/ln Space Superiority Fighter, designed more for low cost and cheap and easy mass production than most any other criteria, is the backbone of the Imperial Navy's (and Army's) starfighter corps. In spite of, or perhaps because of, its many design compromises, including the lack of life support, armor, shields, or hyperdrive, the TIE/ln is a fast, nimble little fighter and can be effective when well-handled. Even when not well-handled the TIE fighter is cost-effective enough to be thrown at an opponent en masse until the enemy is eliminated or runs out of ammunition.
The TIE/ln's stat line is, as befits its status, pretty basic. 2 red dice for a primary attack is underwhelming but chances are you'll have more than one of these chipping away at an opponent's defensive tokens and shields so don't worry about it too much. 3 hull and no shields is...not a lot, but 3 agility will keep a TIE on the table much longer than you'd think and often their primary role is to force your opponent to waste time shooting at them. 3 green dice is usually enough to take two or three shots that would otherwise have been directed at your more valuable ships. Just know that TIEs have a tendency to either melt away in the first round or two of combat or stubbornly stick around for the whole game and it's sometimes hard to tell which one you're going to get. I'd plan on your TIE pilots dying bravely for the Empire and you may end up pleasantly surprised if they don't.
Strategy and Tactics
The TIE fighter is a relatively versatile ship and a fun one to use in that your approach will often vary based on the pilot, which we'll break down in the next section. TIEs do well in formations of two or more where focused arcs and repeated attacks make the two-die gun more relevant and their sheer numbers make it difficult for your opponent to pick a target. That said, these ships are usually cheap enough that if you have the spare points in your squad to add one or two to harass your opponent on their flank or work the objectives then they can still get the job done.
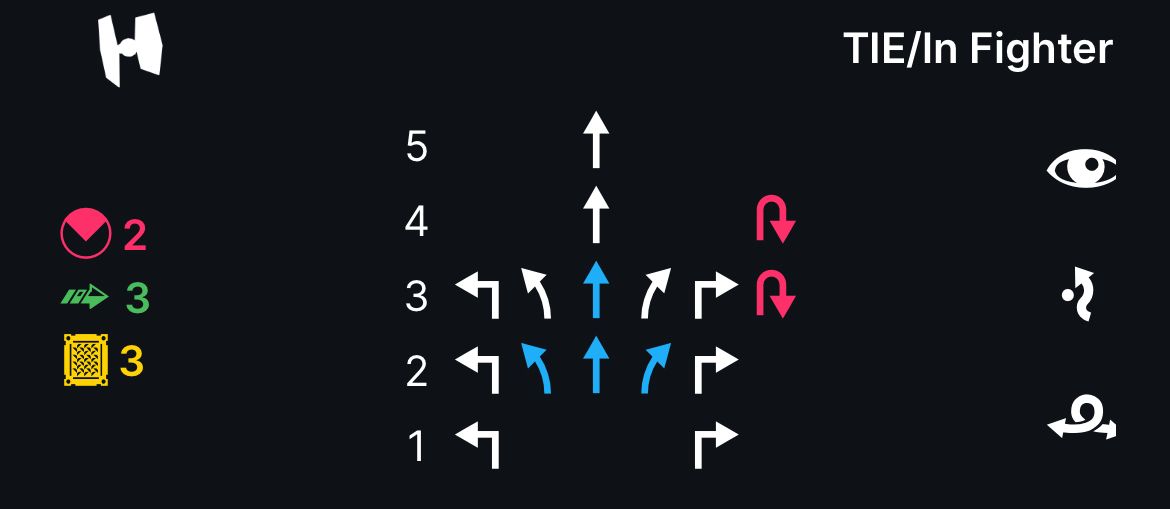
Take a look at the dial posted above. Note that there are only two red maneuvers that will cause stress and a relatively limited selection of blue maneuvers to shed the stress. Having two speed options for the Koiogran Turn is nice because it gives you more options to get turned around in a messy fight but know that if you want to remove the stress with a blue maneuver you're going to be VERY predictable. Sometimes it's better to dial a white maneuver and carry the stress to avoid ending up in a firing arc, especially if your pilot has an ability that will modify your attack or defense anyway or you have a squadmate with a support ability. Also notice the lack of 1-speed straight or bank maneuvers but the inclusion of a 1-turn: the TIE likes to go fast in a straight line but can turn and burn up close. I like to close fast to get my TIEs a range 1 bonus die and then use that 1-turn to stay close and turn inside less nimble ships like X-Wings that will likely need to blow through that first engagement and use a stressful red maneuver to keep their guns on target.
Pilots
At the moment there are a few ways to acquire pilots for the TIE/ln so I'll put the source of each pilot in parentheses next to the name. Of course, you can get all pilots by purchasing a Galactic Empire Conversion Kit if you already have the ship miniatures.
As much as I love writing about lore and biographical info for the individual pilots, that content is the domain of The Briefing Room series, so I'll link names to those articles if one exists.
Academy Pilot (expansion, Core Set)
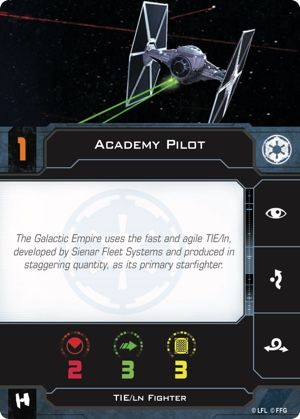
At initiative 1 with no ability you're likely using this non-limited pilot because you've run out of more effective limited options at the same price point. However, sometimes you need a disruptive low-initiative ship that can get in the mix quickly and break up a formation or grab an objective. Also, the developers will occasionally shake up the lower tier pilots by offering Loadout Values or upgrade slots only on certain pilots, so don't sleep on these as an option.
"Wampa" (TIE/ln expansion)
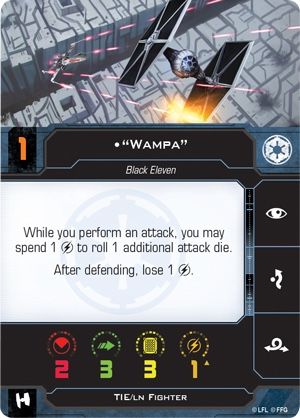
"Wampa" is straight-up fun. He has two clear potential uses (and probably more that I haven't thought of):
- At initiative 1 his ability means that for every time your opponent ignores him they are that much closer to being punished for doing so with a 3-die attack. That attack will also probably have at least one modifier as well since he won't have had to spend a token on defense.
- If you have an I5 or I6 in your squad try equipping the Swarm Tactics Talent upgrade to give "Wampa" a consistent 3-red attack. It doesn't matter if his charge gets flipped after defending if he has already attacked.
Obsidian Squadron Pilot (expansion, Core Set)
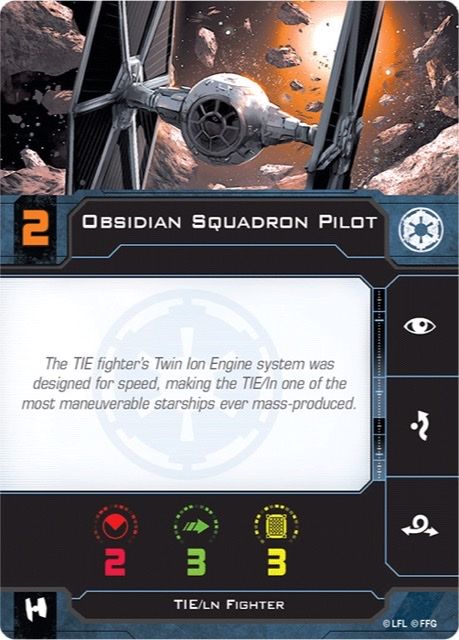
See the above points for Academy Pilot, but the Obsidian is generally granted a bit more Loadout and more flexible upgrade slots at a similar points cost to reflect the higher experience level of the pilot.
"Night Beast" (Core Set)
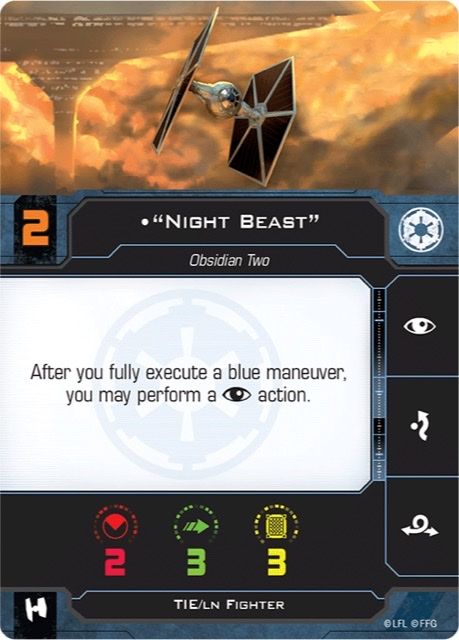
Night Beast, like "Wampa", has a pretty neat ability and generally is a good points bargain. If you can use his ability to end up with a Focus and Evade or Focus and then barrel roll out of an arc he becomes very hard to kill and most opponents will just choose to ignore him. Just be aware that there are only 4 blue maneuvers to choose from and a smart opponent will expect you to opt for those most of the time.
Valen Rudor (Core Set)
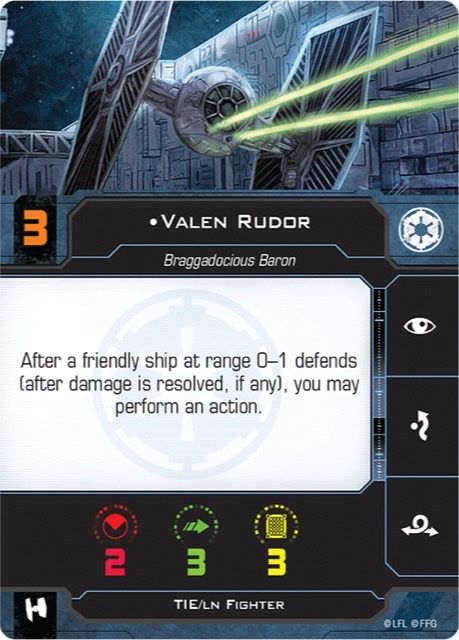
The Baron Valen Rudor is an interesting character from canon and he gets an interesting ability. Remember that the ability works on himself. At Initiative 3 about half of the enemies he faces will fire before him so it's often a good idea to Evade in the Perform Action Step then, after he or a nearby friendly defends against an I6, I5, I4, or another I3, take a Focus action to use on offense. Also fun: when your opponent has two shots lined up on Valen he can barrel roll away from one after the other fires at him.
Black Squadron Ace (expansion, Core Set)
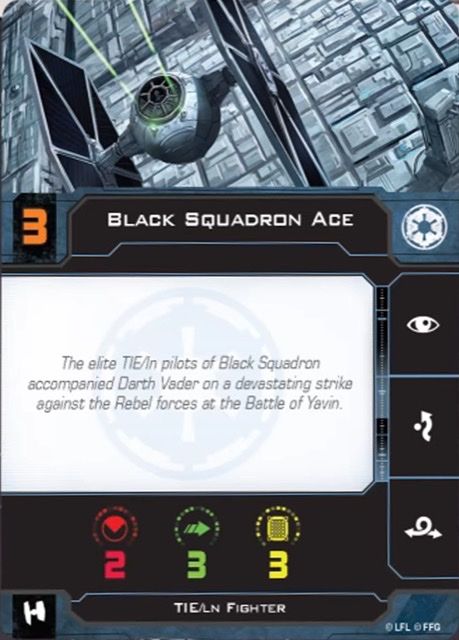
See the above info for the other non-limiteds. The BSA is in a pretty crowded field at I3 and misses some of the benefits of lower initiative. Not sure why you'd use this one unless the points cost is pretty compelling.
ISB Jingoist (Pride of Mandalore Card Pack)
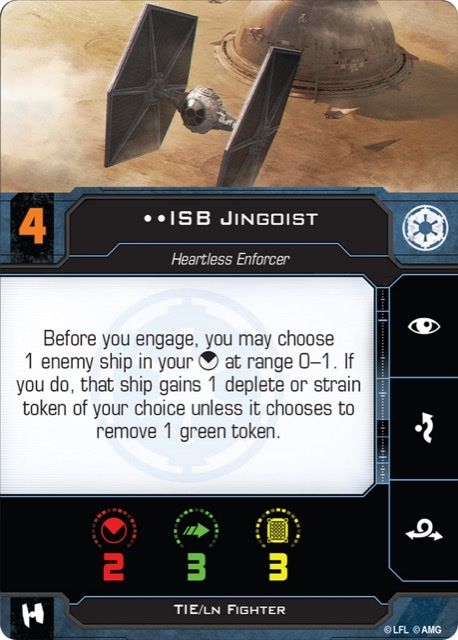
Double-limited (you can have two in your squad) and competitively costed since launch, these guys should probably be one of the first options you look at for TIE fighters. At I4 they can hang around with some of the aces and in most recent points updates they've been granted an Illicit slot which allows for some fun combos. If you manage to rush them in close their ability can wreak havoc on enemy ships, either softening them up with a strain before you fire or weakening their attack if they're a lower initiative - very thematic considering the ISB were the Empire's terrifying secret police. Dead Man's Switch in the Illicit slot is a fun way to take advantage of your proximity to the enemy and deal one last damage when the Jingoist goes down.
*these come in the Pride of Mandalore Card Pack which does not include a TIE fighter miniature, just the cards, cardboard, and dials
Moff Gideon (Pride of Mandalore Card Pack)

Moff Gideon from The Mandalorian brings a lot of the same tools to the table as the ISB Jingoist: I4, usually has an Illicit slot, etc. His ability is pretty powerful but can be a bit tricky to use effectively. To emulate Gideon's willingness to gun down his own troops to achieve his goals, you need to give a friendly ship at range 0-1 of a defending enemy ship a Strain token but in exchange that enemy ship cannot modify its defense dice. Really useful for dealing with a ship with a lot of tokens or Force, and don't forget that it works on any attack, not just Gideon's.
*Gideon comes in the Pride of Mandalore Card Pack which does not include a TIE fighter miniature, just the cards, cardboard, and dials
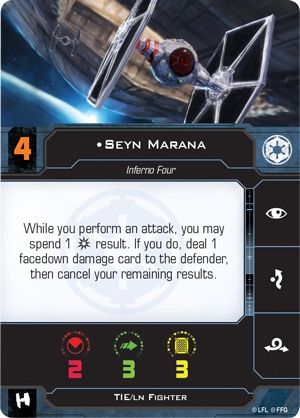
Seyn Marana (TIE/ln expansion)
Seyn Marana is all about precision. If you can find a way to guarantee a Critical Hit result then you overcome the TIE's weak offense by just spending that crit to drop a guaranteed facedown damage card on the enemy. It even goes under shields, which means that the enemy ship is now considered damaged (see Gideon Hask below). I like to add Marksmanship to try and make sure I have a crit to spend.
Del Meeko (TIE/ln expansion)
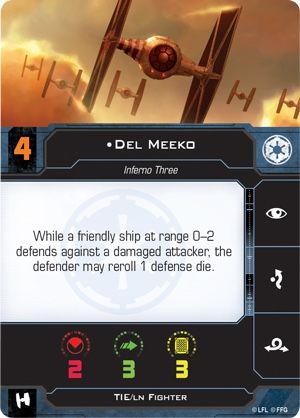
Del joins Iden to form the half of Inferno Squad whose abilities protect friendly ships. Like Gideon, Del's ability is triggered by a damaged enemy and, like Iden, provides rerolls. The Inferno Squad works well by design as a unit if you can make it work. When using Del in a squad make sure you have some higher initiative ships to damage your opponent's squad before they can attack. Also range 2 is a nice bubble for a reroll ability.
Gideon Hask (TIE/ln expansion)
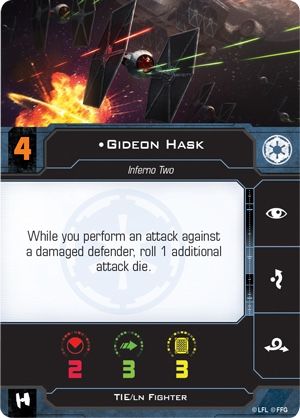
Gideon Hask is available in 3 ships and 2 factions in X-Wing and all of the Gideons are great. Imperial Hask has a very strong ability that often causes him to be costed higher than his peers but he's still consistently worth considering in your squad as a dangerous pocket ace. Since his ability becomes more relevant as the game goes on and more ships are damaged he puts pressure on your opponent to shoot him first and pay less attention to your other pilots.
Iden Versio (Core Set)
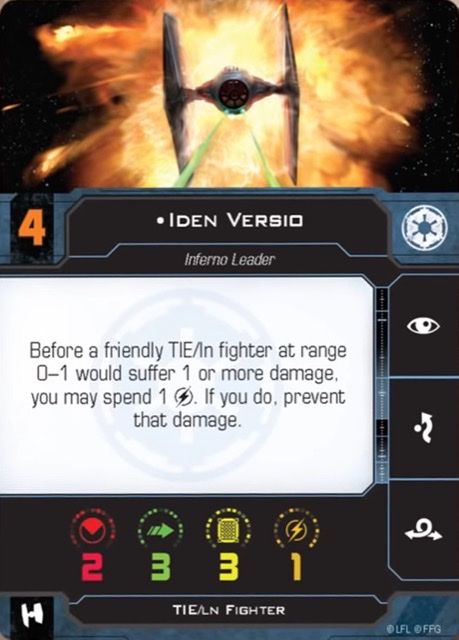
Iden in the TIE Fighter is a great option for any squad with multiple TIE/lns. Sure, you need to stick close to her to get that benefit but also don't forget that the ability can be used on herself. Being able to basically cancel an attack after you know how much damage it will do is amazing. Luke Skywalker rolled 4 hits and a crit with a Trick Shot-Shattering Shot Proton Torpedo and your greens were all blank? Just flip Iden's charge and pretend it didn't happen.
"Scourge" Skutu (TIE/ln expansion)
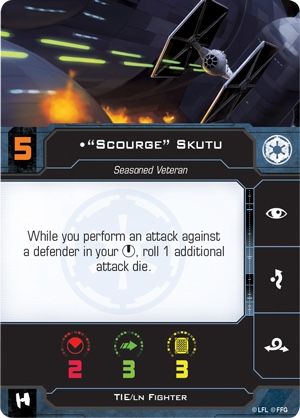
A TIE fighter "ace" can be a lot of fun if used well and the next two pilots are great options to drop into a squad as they can work independently or as a small unit. At initiative 5 "Scourge" can pretty reliably achieve that bullseye and leverage the ability with Talent upgrades like Predator.
"Mauler" Mithel (TIE/ln expansion)
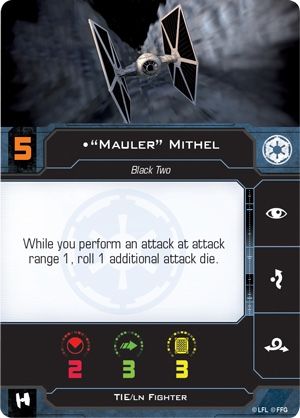
"Mauler's" callsign is appropriate because he likes to get up close and brawl. Any time you can get a three-red attack at a TIE fighter points cost it's going to be pretty good. Both "Mauler" and his buddy "Scourge" are great to fly up the flanks and then dart into an enemy formation to take pressure off of your more valuable squad pieces. With "Mauler" I like to also equip Predator or a similar bullseye ability because an enemy at range 1 will also most likely be in bullseye. Another fun option if the slot is available is to give him a 3-die cannon like Ion Cannon since his ability does not specify a primary attack so you can roll 4 reds at range 1.
"Howlrunner" (TIE/ln expansion)

Everyone's favorite, the undisputed "Queen of TIEs" provides a powerful buff to the attacks of all friendly ships that are able to stay in formation with her. Note that it's any friendly ship, not just TIE/lns. The obvious downside here is that it can be a bit tricky to keep a good number of ships in that range 0-1 bubble without them running into each other, but with a bit of practice that extra dice modifier on multiple attacks (remember, range 0-1 means it also works on herself) is invaluable. Just make sure you can keep her alive (Iden perhaps?) as your enemy will be gunning for her.
Unique or Relevant Upgrades
Disciplined (Talent)
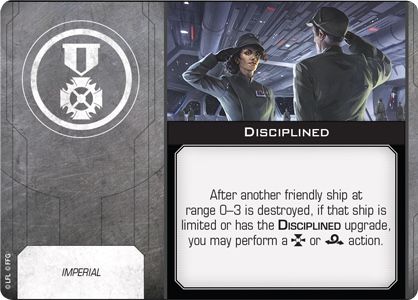
A very fun upgrade to equip in a swarm of TIEs, especially with limited pilots seeing more play, Disciplined allows you to take revenge on the enemy or roll out of arc after they destroy one of your cheap TIEs. Also important to note that TIE fighters don't have the Lock action so this is one of the only ways for a TIE/ln to get a target lock.
Ion Limiter Override (Talent)
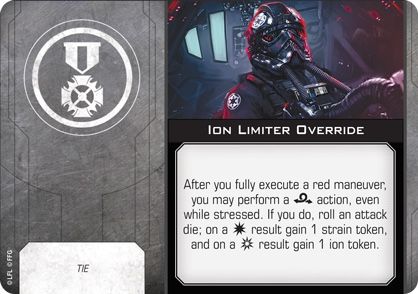
Probably only situationally useful but a ton of fun, ILO lets you barrel roll after your red Koiogran Turn in exchange for gambling on a side effect. This could be useful for your higher initiative pilots like "Mauler" and "Scourge" to ensure their abilities trigger, or for other pilots to hop back into the range bubble of "Howlrunner" or Iden's ability. This one really shines on some of the other TIE ships like the Reaper but it has its uses on the /ln.
Precision Ion Engines (Modification)
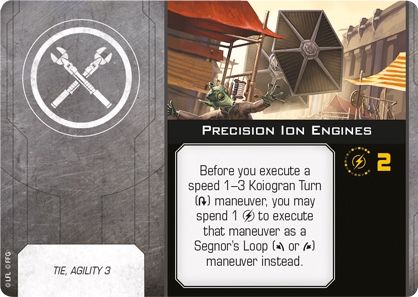
PIE can be useful for shaking up the flight pattern of the fairly predictable TIE/ln, especially for your initiative 4 or 5 pocket aces. Most players will expect TIE fighters to come in for a head-on pass and then, after one or two engagements, try to K-Turn behind and a good opponent will set up ships to block that advanced maneuver. Precision Ion Engines adds two new options to your toolkit and is worth a look if you have the slot and points available.
Ruthless (Talent)
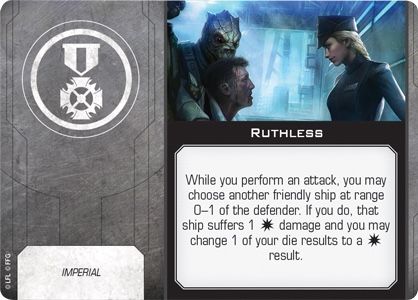
If your TIE/lns just aren't pulling their weight you can always force them to take damage to improve the firepower of one of your other ships.
That's our overview of the Imperial TIE/ln! What are your favorite TIE pilots and how do you use them in your squad building?